Interested in hosting SwaggerUI/OpenAPI docs for your B2C-protected APIs?
NSwag
Swagger/OpenAPI is a way of defining your APIs through a common markup - from that markup, you and your customers/API consumers can autogenerate client code for your API. But what if you want to host a decent UI for developers to test your API? SwaggerUI is an interface that has been around for a while - it may look familiar, lots of APIs use it for sharing docs. ‘Test-in-browser’ for APIs is super helpful for devs who are using your API, but what do we do if that API is protected by a Bearer scheme using something like Azure AD B2C? Oauth2 flows aren’t much fun to code by hand and can be a big stumbling block for your API consumers to get started using your API. Anything we can do to lower the barrier to entry will help encourage adoption.
In dotnet, we have the NSwag package that has OpenAPI/Swagger doc auto-generation from your API controllers, plus some client-generation code, and of course, SwaggerUI, all shipped as middleware. More docs on wiring this up for your app can be found here. Let’s dig into how we can use UseSwaggerUi3 with OAuth2Client to give your consumers a first-class API doc experience using NSwag and B2C.
B2C setup
First we need a B2C-protected API registration, some scopes exposed by that API and a client app (SwaggerUI) that can request access to those APIs. We’ll also need at least one sign-in policy. You can check out the docs here for getting your B2C tenant created and configured with an Identity Provider and user flows.
API app
If you already have a B2C-protected API, you can skip this part. First we need to create a new app registration, indicating it’s a webapp/api. Make sure you also give it an App ID URI - this will be important for defining scopes.
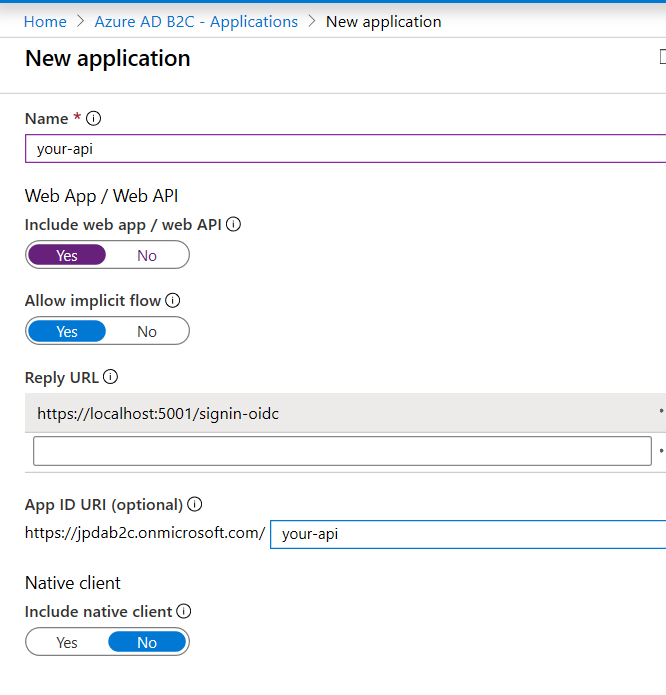
Next let’s define some scopes. Scopes are permissions that other applications can request from your application. Applications requesting these scopes are only allowed to perform operations within that scope, regardless of what other permissions the user may have. Scopes give us more control over how external apps integrate with our services and the kinds of data/actions they can execute. For example, if you ran a photo sharing service, you may have scopes like ‘PhotoLibrary.Upload’ or ‘PhotoLibrary.Read’ - this way, my super awesome camera app could upload photos to the user’s photo library, but not read or modify photos that are already in the library. Well-scoped APIs are important, especially today when so much of our digital lives is centralized around few providers. Do I really want to give a camera app in the store permission to upload photos to Google Photos but also get access to my Gmail and Calendar? Probably not.
In B2C, defining scopes is done via ‘Published Scopes’ under your API’s app registration. Add whichever scopes you deem appropriate.

If you didn’t define an App ID URI in the earlier step, you’ll need to do it before adding scopes - it’s under the Properties blade of your app registration.
We’ll also need to configure aspnetcore to use Bearer authentication for your APIs. Check here for a full sample. Without this, your APIs are unprotected and none of the work we do here will have any effect.
SwaggerUI client app
Next we need to create another app registration in B2C. This app registration represents your SwaggerUI app, which will effectively be a client of your API. Because your API has published scopes, we’ll also want users to be able to request those scopes in the tokens they request via SwaggerUI, so we’ll need to make sure permissions are granted to allow the SwaggerUI client permissions for the appropriate scopes.
Create a new app registration, again marking it as a webapp/api. You’ll also need to make sure to allow implicit flow and set a reply url. You can do this during app creation or within the Properties pane after creation. In this case, I’m using kestrel (not IIS Express), so my reply url is https://localhost:5001/swagger/oauth2-redirect.html.
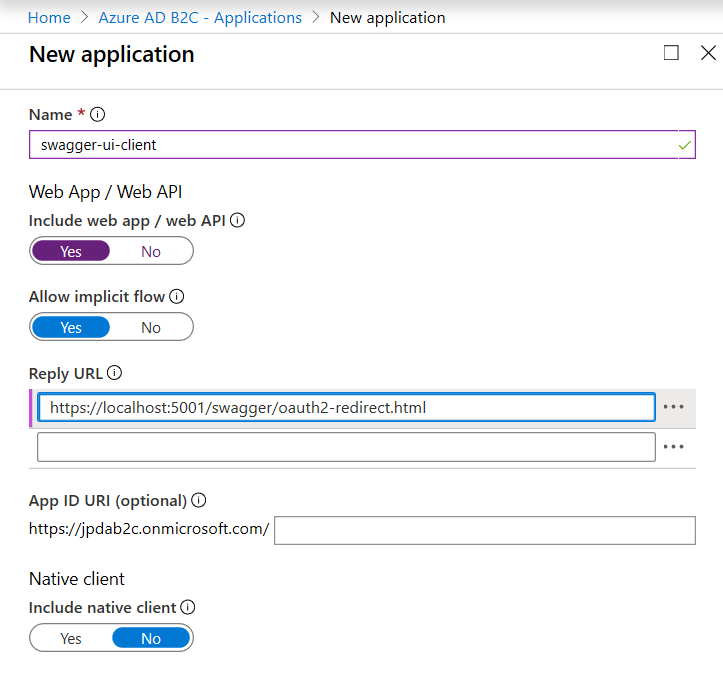
Once you’ve created your app registration, we need to allow the SwaggerUI client app to request specific scopes from your API. Note that not all scopes may be appropriate here. For example, if your API exposes operations that don’t make sense for a user to request, or aren’t applicable to your user-facing API (e.g., some sort of batch or ETL process, or a service-to-service method), you may not want to allow a user to request that scope from the UI.
In B2C, go to API Access under the SwaggerUI app registration - Add a new one, find your API from earlier and enable the appropriate scopes.

Save that app and our B2C configuration is complete.
dotnet setup
First let’s add some nuget packages:
NSwag.AspNetCore and Microsoft.AspNetCore.Authentication.JwtBearer.
In our actual software, let’s head over to Startup.cs or wherever you have your aspnet startup class. Here, under ConfigureServices we want to add our OpenApi/Swagger doc configuration, in addition to the OAuth2 configuration.
In our OAuth2 configuration, we have a few values to keep in mind. Remember that these are the scopes that are published by your API and the SwaggerUI application registration was assigned access.
b2c_tenant_nameis the name of your b2c tenant - in my case,jpdab2c- Your list of appropriate scopes (in the format of your app id uri/scope name, e.g.,
jpdab2c.onmicrosoft.com/your-api/read) - Your sign-in flow’s policy ID (this usually starts
B2C_1, the example below showsb2c_1_susi_v2, the name of my sign-in policy - this is the specific policy a user would use for sign-in). - Your
authorizeandtokenURLs for the specific sign-in policy you want to use for SwaggerUI - this may be different from the one users would use to get into your application, if you wanted different pieces of information or requirements for your developer’s flows vs active users. Note the URLs are policy-specific. You can get this from the metadata discovery document under the ‘Run Now’ view of your user flow/policy, or using this format:https://**b2c_tenant_name**.b2clogin.com/**b2c_tenant_name**.onmicrosoft.com/v2.0/.well-known/openid-configuration?p=**B2C_1_user_flow_name**
public void ConfigureServices(IServiceCollection services)
{
    // snip
     services.AddAuthentication(opts => opts.DefaultAuthenticateScheme = JwtBearerDefaults.AuthenticationScheme)
        .AddJwtBearer(opts =>
        {
            opts.Authority = $"https://login.microsoftonline.com/tfp/b2c_tenant_name.onmicrosoft.com/b2c_1_policy_name/v2.0/";
            opts.Audience = "client/application ID of api";
        });
    // see docs for more config options for AddJwtBearer

    // Add security definition and scopes to document
    services.AddOpenApiDocument(document =>
    {
        document.AddSecurity("bearer", Enumerable.Empty<string>(), new OpenApiSecurityScheme
        {
            Type = OpenApiSecuritySchemeType.OAuth2,
            Description = "B2C authentication",
            Flow = OpenApiOAuth2Flow.Implicit,
            Flows = new OpenApiOAuthFlows()
            {
                Implicit = new OpenApiOAuthFlow()
                {
                    Scopes = new Dictionary<string, string>
                        {
                            { "https://<b2c_tenant_name>.onmicrosoft.com/your-api/user_impersonation", "Access the api as the signed-in user" },
                            { "https://<b2c_tenant_name>.onmicrosoft.com/your-api/read", "Read access to the API"},
                            { "https://<b2c_tenant_name>.onmicrosoft.com/your-api/mystery_scope", "Let's find out together!"}
                        },
                    AuthorizationUrl = "https://<b2c_tenant_name>.b2clogin.com/<b2c_tenant_name>.onmicrosoft.com/oauth2/v2.0/authorize?p=b2c_1_susi_v2",
                    TokenUrl = "https://<b2c_tenant_name>.b2clogin.com/<b2c_tenant_name>.onmicrosoft.com/oauth2/v2.0/token?p=b2c_1_susi_v2"
                },
            }
        });

        document.OperationProcessors.Add(new AspNetCoreOperationSecurityScopeProcessor("bearer"));
    });

    //snip
    services.AddControllers();
    // ...
}
Next let’s tell aspnet to enable the UI. The code below includes the entire Configure method used in aspnetcore3’s API template - I’ve included it for posterity but yours may/will look different depending on your configuration.
Here we have a couple of values to note:
ClientIdis the client ID/application ID of the SwaggerUI application’s registration. You can get this from the Properties pane of your client app’s registrationAppNameis a display name that shows in the SwaggerUI interface
public void Configure(IApplicationBuilder app, IWebHostEnvironment env)
{
    if (env.IsDevelopment())
    {
        app.UseDeveloperExceptionPage();
    }

    app.UseHttpsRedirection();

    app.UseRouting();

    app.UseAuthentication();
    app.UseAuthorization();

    // additions for OpenAPI and SwaggerUI
    app.UseOpenApi();
    app.UseSwaggerUi3(settings =>
    {
        settings.OAuth2Client = new OAuth2ClientSettings
        {
            ClientId = "bb893c2d-fca9-446e-92f7-c4a400491005",
            AppName = "swagger-ui-client"
        };
    });

    app.UseEndpoints(endpoints =>
    {
        endpoints.MapControllers();
    });
}
Now let’s try it out!
Let’s go
Run your app, then head to https://localhost:5001/swagger. Your APIs should have been automatically discovered and you’ll notice an ‘Authorize’ button in the top left corner. Click it and you should see a new modal dialog with some options for requesting a token. It’ll look something like this:
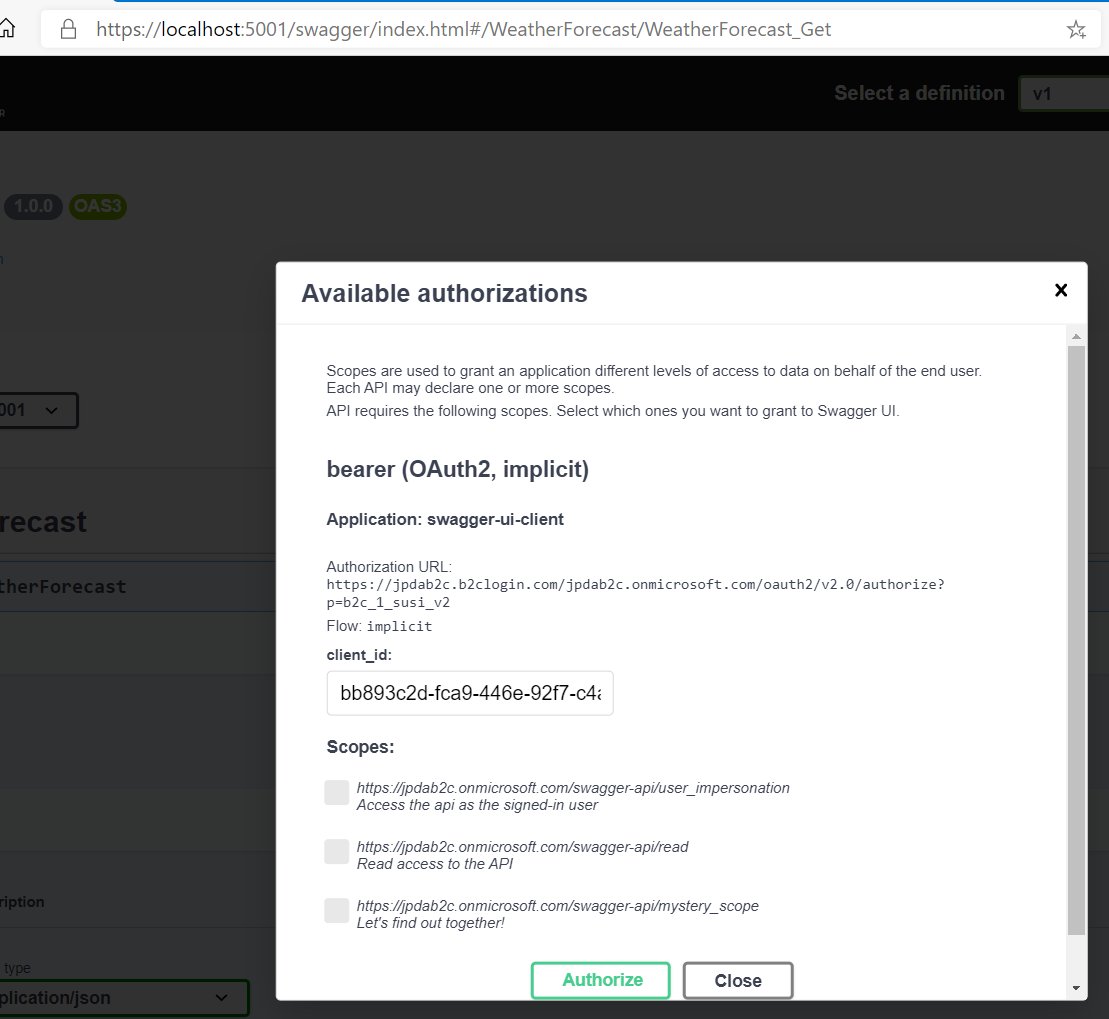
Check the boxes for the scopes you’d like to request, then click Authorize. This should redirect you over to B2C where you can sign in. This policy in my B2C tenant has some UI customization applied:
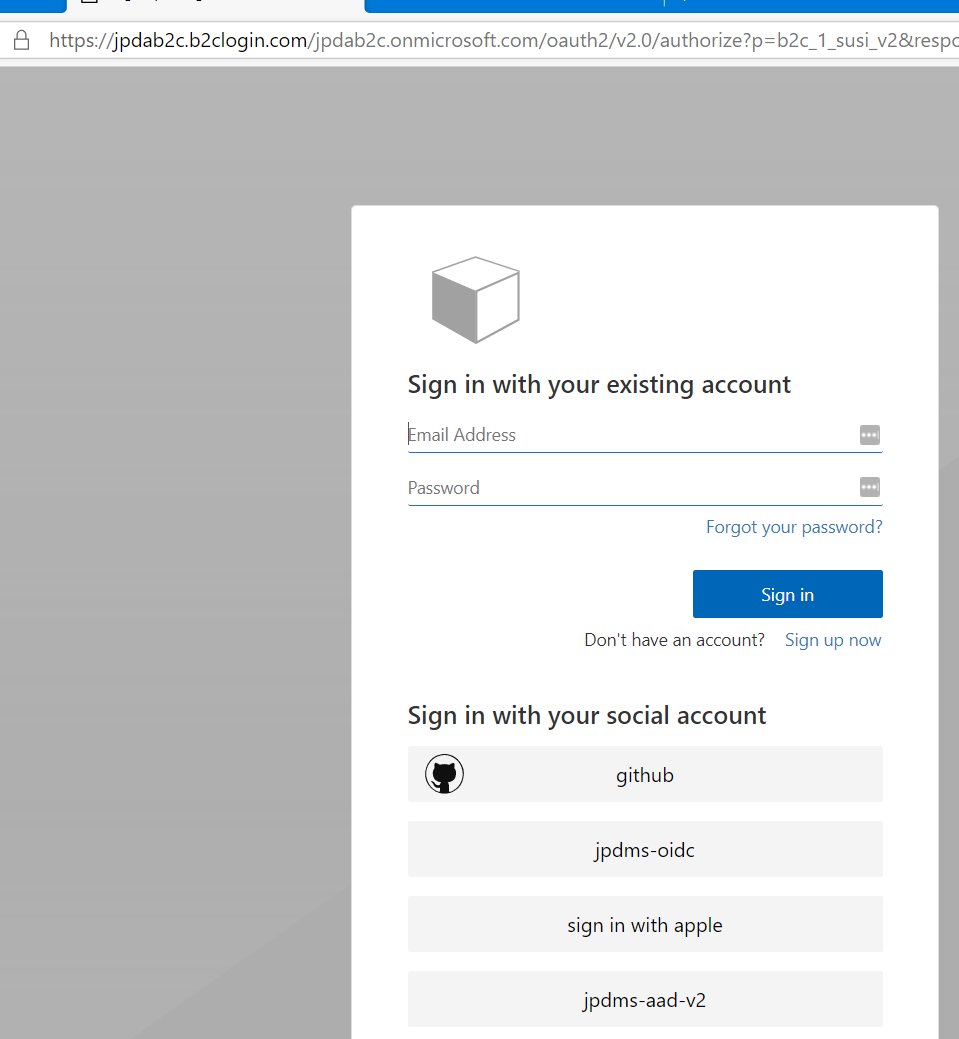
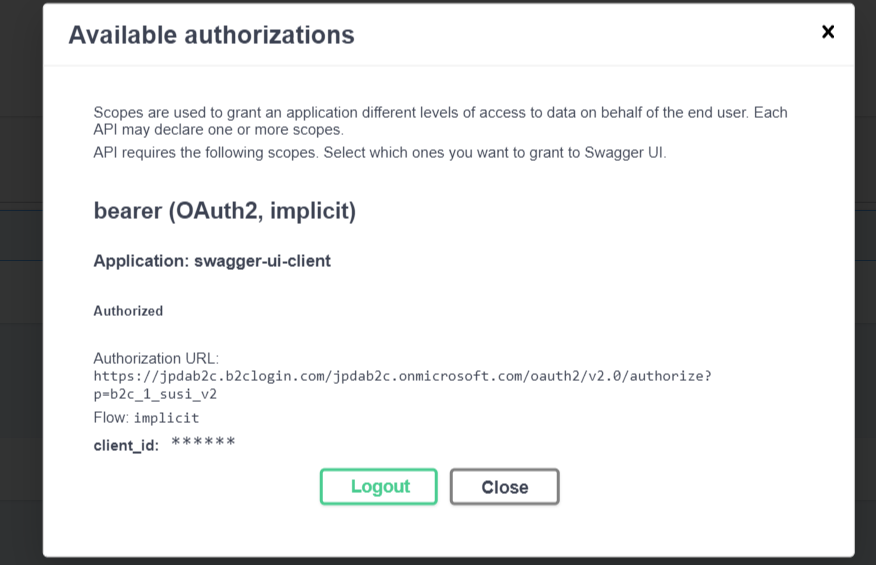
Once we signin, we get redirected back to our SwaggerUI, token in-tow:
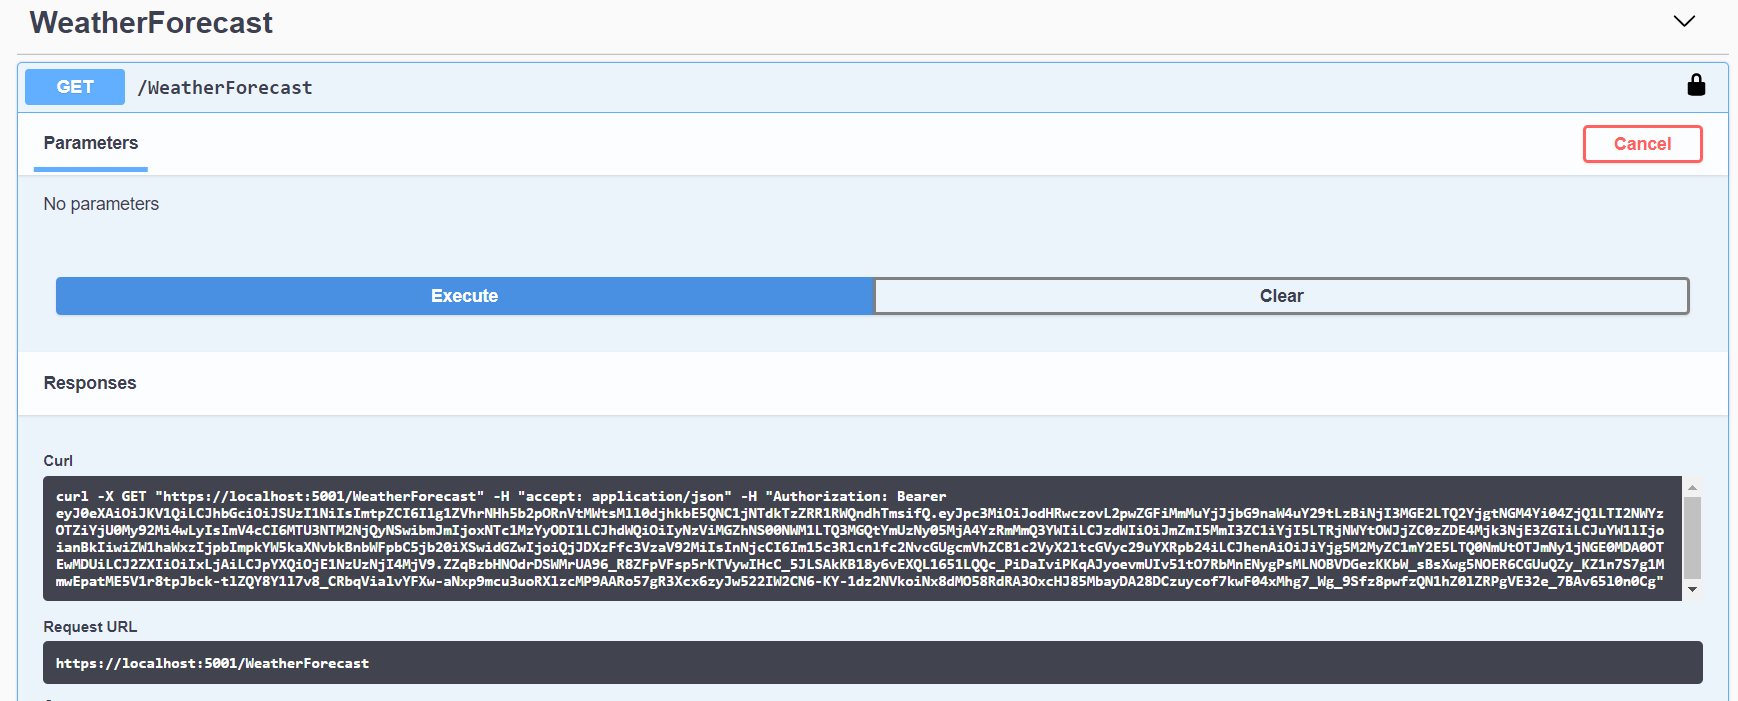
Now when we try out one of our API calls, SwaggerUI handles tacking on the bearer header for us:
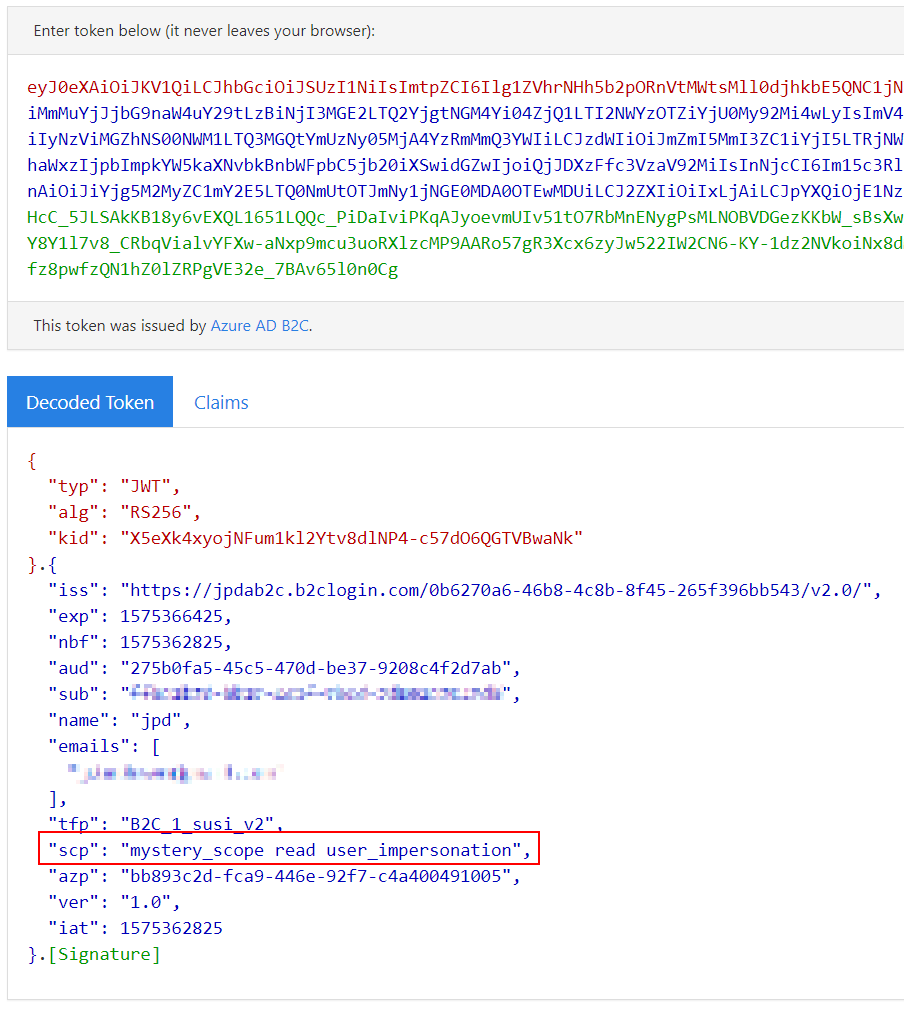
And finally, if we go take a look at the token we received at jwt.ms, you’ll note the scopes we requested in the SwaggerUI modal are also available:
:bowtie:
Find me at @AzureAndChill with any questions or concerns!