Every day we’re bombarded with vendors, providers and ahem consultants telling us we need to break up our apps for maximum scalability & availability for the cloud. This is true — one of the keys to maximizing efficiency is breaking your applications down into units of work that can be scaled independently. This comes at a cost, however — imagine your Azure cloud project is made up of a dozen web services all spread out over a dozen web roles? That gets pretty expensive pretty quickly, especially if you’re targeting SLA — 24 instances for a dozen services?
Let’s say you’re migrating a few LOB apps to the cloud — does each of these need its own scalability unit? Perhaps they work in concert together, or perhaps no single application taxes the underlying servers more than a few percentage points at a time. Is this really the most efficient use of resources?
Breaking your application into smaller units on expected scalability boundaries is a best practice, without a doubt — but does that require that each service live within its own instance all the time? Let’s revisit our guidance and turn it into something more palatable and more explicit. We’ll look at two examples, reusing queue workers and stacking multiple IIS applications on a web role.
We’ll touch on two cloud pattern implementations — competing consumers + service consolidation.
Application Design vs. Deployment Design
We should always write and design our services in discrete scalability units — but how they are deployed is a deployment question, not a design question. If we write expecting each of these units to be in its own container (e.g., stateless, multi-instance), what hosts the code (and what else the host is hosting) becomes irrelevant until our scalability requirements dictate we move those units to individual hosts.
Multiple Personalities
In a complex application, reliable messaging is a must, especially as we start to break our application into multiple discreet services. Reliable messaging through queues is a standard pattern, but how do we design our queues and workers? Are they one-to-one between queue/message and worker implementation? Perhaps they are when we roll to production or ramp beyond pilot, but this is the cloud…why are we deciding this now?
Let’s start with a simple application — this application uses two queues, one for regular messages and one for exception messages. Each queue has queue workers that are dedicated to doing performing a task:
- for regular messages, the message is persisted to storage and a service is called.
- for exception messages, the exception is parsed and certain types of exception messages are transformed to regular messages and dropped back onto the regular queue.
How is our Azure solution arranged to accomplish this?
- Storage Account
- Regular Q
- Exception Q
- Cloud Service
- Regular worker
- Exception worker
They seem awfully similar, yes? Since we’re writing this code in its entirety, what’s to keep us from having a queue worker with multiple personalities?
Here’s our code today:
public interface IQueueManager
{
  object Read();
  object Peek();
  void Delete(object message);
}

public class MainQueueManager : IQueueManager
{
  //implementations
}

public class ExceptionQueueManager : IQueueManager
{
  //implementations
}
And the worker role’s Run() method. The ExceptionWorkerRole’s code would be remarkably similar, but in a separate role (thus incurring additional cost).
public class Worker
{
  public void Run()
  {
    while (true)
    {
      var queueManager = new MainQueueManager();
      var message = queueManager.Peek();
      var mainQueueProcessor = new MainQueueProcessor();
      mainQueueProcessor.Process(message);
      queueManager.Delete(message);
      Thread.Sleep(1000);
    }
  }
}
This implementation is fine, but now we’re stuck with a single function queue worker – it reads a single queue and processes that message a single way. There are two specific behaviors we’re concerned with – the Queue which gets read, and the actions that happen depending on the specific message. If each of these is abstracted appropriately, our worker role can do whatever is appropriate under current load. This could be as simple as a condition in your worker role’s Run() method that checks all known queues, the type of message, then invokes one of a variety of implementations of an interface. Sound like a lot? It’s not. Let’s dive in.
Looking at all Queues
We’ll start with which queue to read from – we want to read from all queues that we get from configuration (or through DI, or however you choose to get them), so let’s abstract that away a bit:
public class Worker
{
  private IEnumerable<IQueueManager> queues;
  public void Run()
  {
    //get queues - create queue managers from config, pass from constructor, etc.
    queues = new List<IQueueManager>();
    while (true)
    {
      foreach (var q in queues)
      {
        DoQueueThings(q);
      }
      Thread.Sleep(1000);
    }
  }
}
All we’ve done here is allow a single worker to look into multiple queues – without changing any of our core queue management or processing code. The code that handles reading/peeking/deleting from the queue has all stayed the same, but our code can now run in a shared host with other queue readers. On to the queue processor.
Processing Different Messages
Now we need to do something depending on which message we get. This could be based on whatever criteria fits the need, for instance, perhaps the message data can be deserialized into a type with a specific flag. In our simple case, we’ll just look at the message data and check for a string.
private void DoQueueThings(IQueueManager queueManager)
{
  var message = queueManager.Peek();
  if (message.ToString() == "uh oh")
  {
    var eqp = new ExceptionQueueProcessor();
    eqp.Process(message);
  }
  else
  {
    var mqp = new MainQueueProcessor();
    mqp.Process(message);
  }
  queueManager.Delete(message);
}
Considerations
This is a very simple consolidation pattern, which allows each worker instance the ability to do more than one function – excellent for controlling cost or management. There are times this isn’t appropriate – make sure functionality is grouped with similar tasks – e.g., if one task requires high CPU, it may not be appropriate to scale with something processing a high volume of low CPU bound tasks.
We’re also implementing a simple competing consumers pattern (with a queue, not through our service consolidation), where some number of instances greater than one is capable of reading off of a single queue. This may not be appropriate when operations are not idempotent (e.g., function or task cannot be repeated without side effects – iterators are a classic example of this), or where the order of messages is important.
Stacking Sites in Web Roles
Previously we were looking at code changes we can make in our worker roles that can optimize efficiency – but these are all code changes. Next we’ll tackle IIS – this is all configuration, no code changes required.
Anyone familiar with running IIS knows you can run multiple web sites within a single IIS deployment – not only can multiple sites run on IIS, multiple sites on the same port can run using host headers. Azure provides you the same capability – through ServiceDefinition.csdef. It’s not immediately obvious in Visual Studio to accomplish this, but it’s quite easy once you’re comfortable with how Azure services are configured. There are two things we need to handle – one is the actual configuration of the web role, the other is making sure all sites are built and copied appropriately during packaging.
Solution
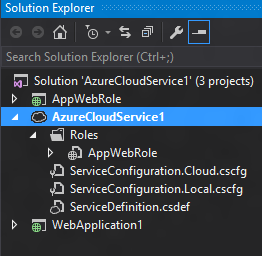
Our solution configuration is pretty simple – an Azure cloud service with a single web role and two MVC web apps. We’ve also got a single HTTP endpoint for our web role on port 80.
ServiceDefinition.csdef
We’ll start in ServiceDefinition.csdef – here we’ll essentially configure IIS. We can add multiple sites, virtual directories, etc – for our purposes, we need to add an additional site. The ServiceDefinition.csdef probably looks a bit like this currently:
<WebRole name="AppWebRole" vmsize="Small">
  <Sites>
    <Site name="Web">
      <Bindings>
        <Binding name="Endpoint1" endpointName="Endpoint1" />
      </Bindings>
    </Site>
  </Sites>
  <Endpoints>
    <InputEndpoint name="Endpoint1" protocol="http" port="80" />
  </Endpoints>
</WebRole>
Pretty straightforward. Now we need to let the Azure fabric know that we’re hosting multiple sites within this web role. You’ll note there’s a ‘sites’ collection - here we’ll add our additional sites (I’ve changed the endpoint names to make them more readable). Let’s take a quick look at what’s been done:
- First — we’ve added the physicalDirectory attribute to the Site tag. This is important and we’ll dig into it in a moment.
- The bindings have been updated to add the appropriate host header. In this example, we want our main site to receive all traffic, so we’re using *
- The second site should only respond to specific traffic, in this case, app2.jpd.ms.
<WebRole name="AppWebRole" vmsize="Small">
  <Sites>
    <Site name="Web" physicalDirectory="..\\..\\apps\\AppWebRole">
      <Bindings>
        <Binding name="App1Endpoint" endpointName="HttpEndpoint" hostHeader="*" />
      </Bindings>
    </Site>
    <Site name="Web2" physicalDirectory="..\\..\\apps\\WebApplication1">
      <Bindings>
        <Binding name="App2Endpoint" endpointName="HttpEndpoint" hostHeader="app2.jpd.ms"/>
      </Bindings>
    </Site>
  </Sites>
  <Endpoints>
    <InputEndpoint name="HttpEndpoint" protocol="http" port="80" />
  </Endpoints>
</WebRole>
Packaging
Now that our service is all configured, we need to get our files in the right place. By default, the packager will package the other projects in entirety as part of the package. This is bad for a lot of reasons, but also removes some functionality – for instance, web.config transforms for projects outside the main project (the one associated with the web role) won’t happen, because msbuild is never called for that project.
There are multiple ways to accomplish this floating around the internet – some suggest updating the Azure ccproj to add additional build events as part of the msbuild script. I personally have used post-build events to locally publish to a subdirectory for each web project, something like this:
%WinDir%\Microsoft.NET\Framework\v4.0.30319\MSBuild.exe "$(ProjectPath)" /T:PipelinePreDeployCopyAllFilesToOneFolder /P:AutoParameterizationWebConfigConnectionStrings=false /P:Configuration=$(ConfigurationName);PreBuildEvent="";PostBuildEvent="";PackageAsSingleFile=false;_PackageTempDir="$(ProjectDir)..\CLOUD_PROJECT\apps\$(ProjectName)"
Make sure to change CLOUD_PROJECT to the name of your cloud project. Dropping this into your post-build event for each web project will build your projects, copy the output to the target folder (matching the project name, this could be changed) before CSPack builds the Azure package.
As we continue to see businesses take their first steps into the cloud, the service consolidation pattern is guaranteed to be a common sight – on-premise IIS servers stacked to the gills with individual web sites is a common pattern, especially for dev/test and low-priority LOB apps. While not advocating for inappropriately reusing existing service hosts, maximizing efficiency of the ones you have can greatly ease your first move to the cloud.